Using the Omega as a WiFi Ethernet Bridge
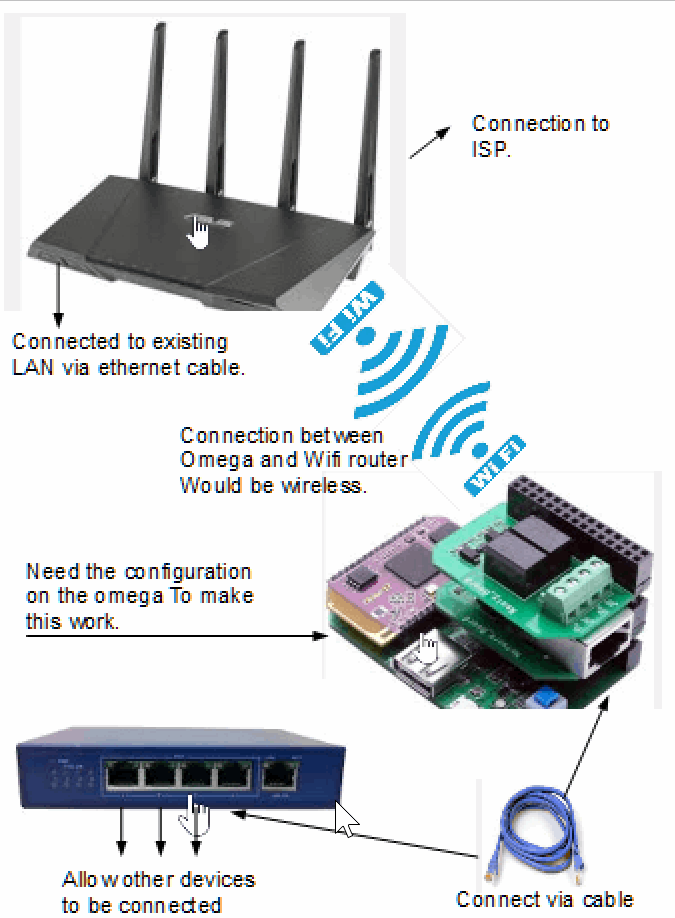
In this tutorial, we are going to go through how we can enable other devices to use the Omega’s Ethernet Expansion to connect to an existing WiFi network.
All we need to do to make it work is to do some configuration stuff, which is super easy. However, note that, once we enable the ethernet connection, the AP is interfered and disabled, so make sure that you really want to do this before you actually start. I will try to connect to my laptop instead of a switch in this tutorial, but it works in the same way.
[[TOC]]
Overview
Tutorial Difficulty:
Intermediate
Time Required:
5 mins
Required Materials:
- Omega
- Expansion Dock
- Ethernet Dock
- (Optional) Lan Switch
Useful Experience:
- Using Omega
- Familiar with Openwrt firewall and network configuration
- Familiar with networking
The Actual Process
What we are going to do is to first enable the Omega’s ethernet connection, and then try to bridge the wireless internet connection with ethernet connection. There are several ways to do so, one of the ways is to modify the firewall configuration.
Step 1: Connect Omega with WiFi
This step is fairly easy, and there are a lot of tutorials tell us how to do so in different ways. Click here to view how to make it work.
Step 2: Enable the Ethernet Connection in Omega
There is an existing tutorial for this as well, click here to learn more.
Basically what we need to do is to uncomment the following part licated at /etc/config/network:
config interface 'lan'
	option ifname 'eth0'
	option type 'bridge'
	option proto 'static'
	option ipaddr '192.168.3.1'
	option netmask '255.255.255.0'
	option ip6assign '60'
However, note that, in the tutorial, the option ipaddr is 192.168.4.1, but our default ipaddr is 192.168.3.1. If we used the x.x.4.1 ip address, the network is actually not working because it does not actually connect to our Omega. Hence, we are trying to use the default one. If you do take a look into the network file in /etc/config, you should find that besides the lan interface which we just uncommented, the wlan interface also has an option ipaddr with value 192.168.3.1. This interface is to enable the AP function of Omeaga and this is how it is being interfered by doing so. If you want, you can just comment the wlan part out, it is not working anyway.
After we did so, what we need to do next is to make the wwan interface (this is the part how Omega is able to access to wifi) connected to lan interface (this is the part we just uncommencted).
If you want to learn more, go to Openwrt network configuration page.
Step 3: Connect the Two Interfaces via Firewall Configuration
There is another tutorial (as I said), click here. This tutorial is how to make Omega as a router. The theory is the same, all we need to do is to convert what is going on in the tutorial.
The theory is that in the firewall configuration located at /etc/config/firewall, the zone wan is route packeting to zone lan. the list network option is what interface each zone can grant access to. By default, it is wwan network interface route packeting to wlan network interface, which means the internet accessed through wifi (wwan) is sending data (route packeting) to the access point (wlan), and that is how we can use Omega AP by default. If you still don’t understand what I am talking about right now, don’t worry, just follow what I am doing, it will work all fine.
Once we understand what is going on, we can modify the file. What we are actually doing is to add a single line of configuration under zone lan.
list network 'lan'
list means access list, you can get the information through Openwrt Firewall configuration page.
Now, the configuration looks like this:
config zone
    option name     lan
    list   network      'wlan'
    list   network      'lan'
    option input        ACCEPT
    option output       ACCEPT
    option forward      ACCEPT
Full example configuration files are available in their modified and “ready” state in this Github Gist here.
Restart the network service by doing the following commands in this order, or simply rebooting the Omega:
/etc/init.d/firewall restart
/etc/init.d/network restart
If using the commands above, wait until the command prompt reappears before it is ready.
Step 4: Connect to Lan Switch via Ethernet
Since we configured all the things, and restarted the service, now we should be able to connect with other devices via Ethernet.
Make sure that your conection is set to Obtain IP address and DNS anddress Automatically. It should be set so by default.

Using This Setup
If you have a device that only can be connected via Ethernet and you only have WiFi avaliable, you could apply this tutorial to make it work!
Or, you can extend Ethernet access to multiple cables using an Ethernet switch.
Notes
- This will disable the Omega’s WiFi AP.
Related Tutorials
Acknowledgements
Some more information can be found in our Onion Community thread here.
Or you can visit the following websites to learn more: